Our beautiful parent coworking space is connected to the classroom with a separate entrance, to ensure that you are able to be productive and work closely to your child.
The space is equipped with Wifi, a comfortable office and meeting area, spacious bathroom with changing table, and a coffee and tea kitchen.
Welcome to our new preschool location and parent co-working space! Here a few photos taken during the Montessori Preschool & Early Preschool Classes in May of 2024, a few weeks after we opened the school.
Explore the diverse offerings of the Montessori Family Center in the heart of Düsseldorf, where families embark on a unique journey. This carefully crafted indoor playground and Kindercafé caters to children aged 0 to 6, providing a thoughtful environment for early childhood development.
Cover picture: Movement Room
This expansive area is thoughtfully designed to foster free movement using Montessori and Pikler materials. The goal is to promote the development of children’s gross motor skills, coordination, balance, and spatial awareness in a secure and supervised environment. Specifically tailored for infants and toddlers aged 0 to 6 years old.
Montessori Family Center – Düsseldorf:
The Family Center boasts various services, including structured activities like ‘work cycles and free play,’ engaging workshops, informative courses, and exciting events. It is also ideal for family gatherings, including memorable birthday celebrations.
Understanding that children thrive when engaged in purposeful activities tailored to their developmental needs and interests, the center offers carefully curated work cycles. Within these cycles, children are presented with opportunities to delve into exploration, discovery, and mastery of new concepts at their individual pace. These work cycles foster concentration, independence, and a genuine enthusiasm for learning, laying a robust foundation for academic achievement and lifelong curiosity.
Equally integral to the center’s approach are ample opportunities for free play. Recognizing play as the natural language of childhood, the Montessori Family Center encourages children to express themselves, develop social skills, and nurture creativity through play. Within the thoughtfully prepared environments filled with engaging materials and open-ended activities, children are invited to follow their interests, collaborate with peers, and unleash their imagination in a supportive atmosphere.
Step into a space meticulously prepared to embody the Montessori method, specifically designed to welcome newborns, infants, toddlers, preschoolers, and children with special needs. The Lovevery Room is a charming space dedicated to providing little ones with opportunities to interact with stage-based materials that support cognitive, social-emotional, communication, and early STEM skills development.
The Family Center is a hub for like-minded families to connect, share experiences, and foster new learning opportunities for parents, guardians, and children. The Parent’s Lounge is for those moments when a comfortable seat and a brief respite are needed. Recognizing the importance of taking a few minutes each day to regroup or unwind, this lounge provides the perfect sanctuary for parents to relax or engage in pleasant conversations with fellow moms and dads.
The facility boasts abundant natural light, spacious ceilings, and a well-appointed kitchen with an integrated Cafeteria where families can savor delicious coffee, tea, soft drinks, and snacks. Additionally, there are two modern bathrooms, one equipped with a convenient changing table, a designated area for stroller parking, and a welcoming reception area.
The Children’s Working Room is meticulously crafted to embody the concept of “work cycles” from Montessori philosophy, allowing children to engage in activities that enhance fine motor skills, concentration, language, and mathematical abilities. Geared towards infants and toddlers aged 1 to 6 years old.
About the founders
Yuliia Storozhylova (right)
COO, co-founder, mother In addition to her administrative responsibilities, Yuliia contributes to curriculum development, creating sport-oriented courses for children and parents. Yuliia manages daily operations and process organization, applying her expertise in sports, science, and medicine to support the Center’s mission.
Natalia Reynders (left)
co-founder, CEO, mother Natalia is a dedicated multilingual mother and passionate advocate for child-centered education. Originally pursuing a degree in agriculture in Chile, Natalia’s journey took a transformative turn to education, fueled by a desire to provide the best educational environment for her son.
Natalia holds Montessori certificates from Association Montessori Internationale (AMI) and International Montessori Institute (IMI) and strives to ensure the Montessori Family Center remains at the forefront of innovative pedagogical practices.
Hello there! I am excited to be able to share this photo tour with you of our Montessori Newborn Class for small babies and their parents. The starting age for this class is 6 weeks – 7 months old from the first day of the term. Newborn Class is offered every Thursday and Friday from 9:30-10:30. You can find more details and join the waiting list at the link above.
Montessori Classes are child-led so each week is different as the babies’ interests and skills advance. The structure of the class as well as the other students in the group are the same each week to support the child’s need for routine and community.
1.Entering
Your child’s Montessori class starts as soon as you enter the school.
Parents help the babies come in and lay down on one of our floor-mats or carpets to remove their outside layers of clothing.
2.Montessori Work Cycle
The classroom is fully prepared with educational materials which support every stage of Baby’s motor, visual, and cognitive development.
Parents decide which movement area to start the work cycle.
From there, Baby can choose from the available materials or work with a mobile.
Parents offer only 1 or 2 materials at once, removing materials which are not in use. Baby will indicate which material or area they are interested in exploring by looking or reaching in that direction.
Parents have time to connect with each other, to speak with the Montessori teacher about any questions, and complete their weekly observation worksheet.
The teacher moves around the classroom, working with each baby on different skills that the child is currently focused on learning.
3. Montessori Snack Time
Babies sit together around a low table. They can sit on the parent’s lap or in cube chairs.
Every week we explore a new food. Even babies who are not eating yet enjoy watching, touching, and smelling the fruit or vegetable of the week.
Babies explore tiny cups and silverware and can learn to drink water from a cup if they are interested.
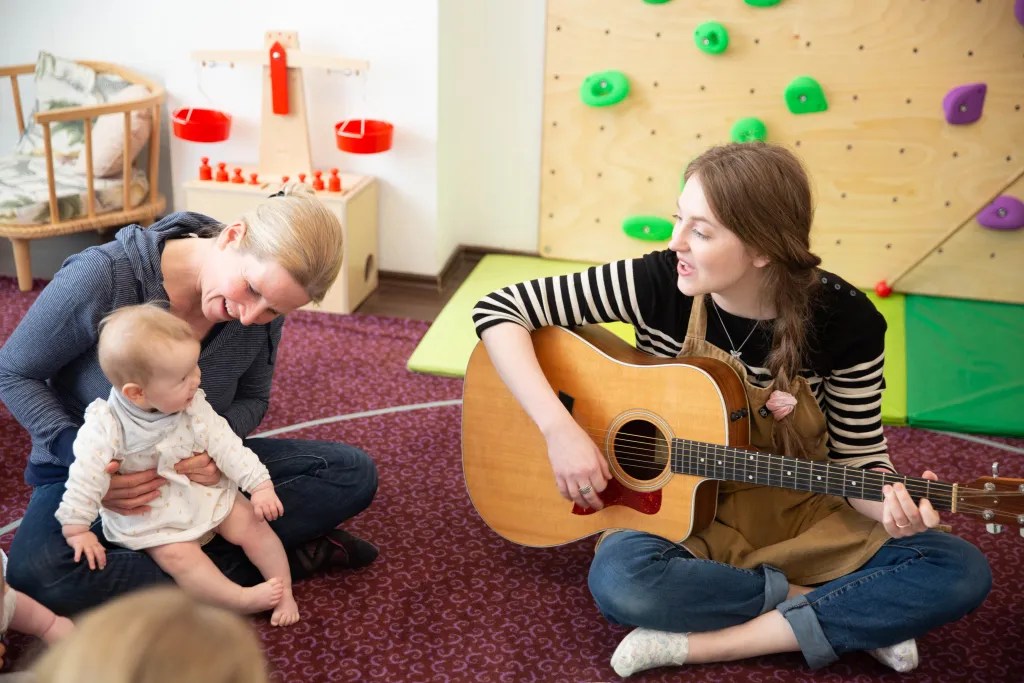
4. Music Circle
During Music Circle we sing in English, German, and any other languages present in the group. Sometimes we use instruments or play silks.
Babies lay on their back with their feet towards their parent, in a circle. They really enjoy hearing the music and watching you sing and dance. Mobile babies may prefer to lay on their belly and move around during the music.
At the end of class we sing goodbye to each baby. 🙂
Thank you for reading!
If you would like to participate in this class in the future, you can join the waiting list HERE! If your baby has not been born yet, you can use your due date and write “Baby” in the Name section.
Montessori Ikea Hacks – part 1 is by far the most popular post on this blog. Since 2019 both our Montessori classroom and my IKEA hacking skills have come a long way, so I am sharing some before and after photos from those original areas posted AND 4 more corners of our school which were made from IKEA furniture. I really love IKEA, can you tell? 🙂
Toddler Woodworking Station
The woodworking station is a special place of pride for our students. Humans have the natural tendency to use tools to do their work. Because of this, the presentations for these materials are very short because children as young as 12 months can use them intuitively. Older children use this area to make their own, small constructions. 🙂
HOW TO USE:
Each tool has its own pre-prepared block which fits into the table insert. This keeps the block stable, isolates the difficulty of the tool, and supports the sensitive period for order.
The tools are arranged from least to most difficult, bottom to top, right to left. This is useful for a mixed age classroom, or for different-aged siblings using the work station at home.
The presentations are hammering nails, wearing goggles, unscrewing screws, cutting soft balsa wood strips with a saw, sanding, and drilling holes. There is a small broom and dustpan available for sweeping up sawdust.
Older students usually prefer to work here while sitting in the chair, while babies prefer to sit on the floor or work while standing.
We teach safety and respect for the tools by setting limits on how and where they may be used. Safety goggles are available and the tools may be used with or without them. We don’t use gloves in this area because they get in the way of the child’s precision.
HOW TO MAKE (photos linked)
Work blocks, table insert, and balsa-wood sawing dowels are homemade by Chad, woodworker. and Montessori guide. Custom orders can be made to montessorimothermatierlas@gmail.com
Toddler Library
This library is a simple, cozy place, bright with natural light, where children can easily choose their books and read them. They love to sit on the reading bench. The little table and chair is also available because it’s more comfortable to read large books there.
TIPS:
Avoid layering the books so they don’t fall down when the child chooses them.
Limit the number of books on the shelves, keeping the rest on your adult bookshelf or put away.
Rotation: keep the child’s favourite books on the shelf. Switch out books which are not often read or damaged books.
Hang the shelves at the child’s level, very low to the ground, so that they can reach even the top shelf.
If you have vintage books or treasured books that the child can only read together with you, keep these on a higher shelf within the child’s view so they can let you know whenever they want to read it.
Model respect for books by handling them very carefully and not setting them on the floor.
Try to read only one book at a time, putting them back on the shelf after looking at them. This helps to support concentration.
HOW TO MAKE (photos linked)
Plant Care Areas
Having living plants at home teaches children how to care for living things which are smaller than them. They learn about the different needs of plants and the benefits and consequences of how their needs are met. If the plant is watered well and kept in the light, it will flourish. If it is watered too much or too little, it will die.
A plant and watering can is a great gift for a child. They can even pick out their own special plant at the store or grow it up themselves from a seed. The plant table is a special place where the plant lives and where you keep the watering can and towel.
HOW TO USE:
Fill the watering can yourself and invite the child to watch you water the plant.
Slowly pour half the water into the soil, using two hands.
Set the watering can down on the table and invite the child to try. The child will then water the plant or possibly spill on the floor or try to drink the water. This is okay because they are learning!
Use the sponge or towel to wipe up the spill.
Invite the child to re-fill the pitcher of water by themselves. If the child is still not walking yet, fill the pitcher again for them with a very small amount of water from another pitcher which is kept at your height.
HOW TO MAKE (photos linked)
Parent & Child Dressing Area
A child-sized dressing area helps children to be responsible for their personal items and practice self-dressing. This area includes a child shelf, an adult shelf, adult changing chairs, a child changing bench, and both low and high coat hooks.
HOW TO MAKE (photos linked)
UPGRADES IN OUR CLASSROOM
1. Art Area
BEFORE
AFTER
changes:
This easel and clip set up is still the one we use today! The new easel model from IKEA is great in that the height does not need to be modified and the paper roll is easier to use (we have this model at home for our toddler). However, it does not have a tray to hold paint cups. For this reason our trusty IKEA hacked easel is still going strong in our environment and is nearly constantly in use.
We have added another chair and table set to this area.
The chest of drawers is near the shelf and in its place is a Montessori hand washing station, strategically placed for washing painty hands. 🙂
This lamp was replaced for the lovely IKEA FUBBLA lamp. The only drawback with this one is that the button for turning it on and off is very tough and only our 2+ year olds can manage to push it completely.
We added a hook to the wall for the apron, so it would not be in the way if a child chooses not to use it.
Hidden behind the easel we have a small Tesla tape dispenser to easily hang up wet paintings and tape paper sheets to the easel at the bottom.
In Montessori also offer 3 colours of paint at a time now, rather than just two. In Montessori Baby Classes we either offer 1 cup of paint or only the crayons.
We now use a paper roll which is 60cm wide which covers the entire easel surface, giving the children a larger and more obvious surface to paint on.
We changed the old unfinished wooden frames for the plastic FiSKBO frames which are easier to keep clean.
2. Toddler Work Area
BEFORE
AFTER
changes:
These tables had to be replaced after much use and love. We now use the KRITTER tables from IKEA, which have also been shortened to stand at 38cm tall.
The chairs are still the same as we have had since 2018! We have only broken 1 chair out of 15 in all this time!
Our wall art is now displayed in the plastic HOSTVA IKEA window frames. They are a little crooked, because we have to drill new holes after them being pulled down so many times. 🙂
The table and chair set in this area now lives in the middle of the space, with the shelves against the wall. I find this to be more inviting for the children to sit down and work.
3. Self Care Area
BEFORE
AFTER
changes:
We have a different tray which allows me to separate the different materials: trying on sunglasses, wiping nose, and brushing hair.
I have added a sign to the waste basket that reads “dirty tissues”
I have added a backpack, a straw hat, and a helmet to the wall hooks to offer more try-on possibilities.
I have a larger lotion jar now and a this little round tray to hold its place.
4. Quiet Corner
BEFORE
AFTER
changes:
In front of the shelf I have added a faux wool carpet, TOFTLUND from IKEA, to make the area cosier.
The bead tracker is in a different part of the Montessori Baby Class environment. Now we have here a large ficus plant for the students to water.
We have a different armchair from Verbaudet. I sewed the cushion cover from the same animal print textile because I loved it so much.
We have a different ball tracker from Nienhuis now in a different place in the classroom. It its place is the scale and weights from Educo with a mystery box base, custom-made for it by Chad.
The books are rotated every term. Now we keep 6 small books in this area, instead of 4. We didn’t have as many books back then. 🙂
Under the aquarium we rotate the materials in each class depending on the age group. During Montessori Toddler Classes we keep two 3D puzzles.
The art is a print by Monet, available on Wikipedia Commons for free. It is hung in a plastic frame, the RIBBA from IKEA.
5. Newborn Movement Area
BEFORE
AFTER
changes:
The walker wagon has 4 rice bags which are used to weigh it down so it rolls more slowly. I sewed handles on the bags so that toddlers can practice loading and unloading the wagon when they are in the Maximum Effort stage of development.
We have a new pillow in this area, LEN from IKEA. And I sewed a fuzzy pillowcase for it. This is used in Montessori Toddler Class when children pretend that they are sleeping or decide to lay down for a rest. In the Montessori Newborn Class I remove this pillow for freedom of movement.
The visual mobile and materials on the newborn shelf are rotated every term. Currently on the shelf we have basket of balls, basket of brushes, sensory wheel, simple threading work – (bottom), posting sticks, outlet puzzle, transparent lock and key, and wooden blocks – (top).
I have added a cloud carpet to the other side of the shelf for babies to work on.
A small, plastic FiSKBO frame is hung on the wall with Tesa tape. The art is “Girl with a Watering Can” by Pierre-Auguste Renoir, available for free on Wikipedia Commons.
In my blogpost Changes at Home When Your Baby Becomes a Toddler I have shared 3 areas of my daughter’s Montessori home environment, which features the classic functional toddler kitchen IKEA hack.
Welcome to our classroom! We are happy to share these beautiful moments with you from our Montessori Preschool Class (3-6y). If you are interested in the class, you can find all the details and join the waiting list HERE.
These photos were taken by the lovely family photographer, Natalia Smirnova.
Thank you for viewing! We look forward to meeting you and your little one soon!
Example Preschool Environment: Guidepost Montessori
Montessori Preschool Class is a 2 hour weekly class for children 3-6 years old to attend with one parent or caregiver allowing you and your child to learn together and bring the Montessori approach home with you!
The class is based on Dr. Montessori’s Casa Dei Bambini, a primary school which allows young children to fulfil their whole learning potential at this critical age through child-led exploration and a prepared environment.
Our materials allow children to learn writing, reading, math, geography, practical life skills like sewing, cooking, woodworking, and so much more! In every class the children will amaze you at what they are capable of when every opportunity is provided for them. To get a picture of our materials and how the children learn through hands-on experience, see the individual areas of our expanding classroom below!
Our current collection of materials represents an introductory class environment for children 3-4 year old. As these children grow, along with our school, we are increasing our collection. We intend to open the doors to our complete 3-6 classroom in March 2023!
Our teachers are AMI-certified Montessori guides with years of experience and a profound love for each and every student. You can meet our team here!
Currently we offer classes ever Monday from 15:00-17:00 and from March 2023 we plan to offer these classes every day! You can join the waiting list and receive updates by filling out this application form!
To learn more about the Montessori Mother Preschool Expansion and get involved you can find full expansion plan HERE!
Sensorial Materials
The Montessori Sensorial materials have been time-tested for over 100 years! They are one of the pillars of the Montessori approach, enabling children to refine all 10 of their senses.
Example:
While the child stacks the 10 blocks to build the timeless Pink Tower, he trains his motor control, his visual precision, and is introduced to the metric rule of 10. The blocks are then used as measuring tools and visual aids for the proceeding materials.
Here is one of our lovely shelves dedicated to sensorial materials.
Writing and Reading
Although in traditional schools children learn to read and write from 6 or 7, we find that the best time for children to teach themselves how to first, write and then, to read, is closer to 3 and 4 years old! From the first sandpaper letters to the grammar analysis materials our students are reading books by 6 years old and they LOVE it.
Example:
A 3.5 year old child starts with a puzzle then uses our wooden letters to match the starting sounds of the words to their letter Peach, Cherry, Watermelon…. Then crafts those letters out of clay or writes them with a water paintbrush onto a chalkboard. A passion for calligraphy and the intrigue of sounds and their symbols continues and grows until the child can write their own name cards to match to their pictures.
Here is one of our shelves dedicated to writing materials where you can see our tracing letters, wooden moveable alphabet (on top) and all of our writing materials. The bottom shelf holds more sensorial materials for refining the tactile and visual senses.
Math
There are SIX groups of math materials in the 3-6 classroom: numbers 1-10, decimals, counting, abstraction, memorisation, and fractions. Starting with understanding quantity and the number symbols, by the end of their time in the Montessori Preschool Classroom, children have learned to divide numbers by the thousands!
Photo: our shelf dedicated to the introduction to numbers 1-10. As you can see this is just the start of our mathematics area because it is one of the largest and most expensive parts of the primary classroom. Our focus currently is teaching all the students to recognise the numbers and have a strong understanding in concepts of quantity, adding, and subtracting numbers from 0-10.
Geography and Biology
This is one of my favourite areas of the preschool classroom as our international community includes families from every continent. Children not only learn the countries, continents, landforms, and bodies of water, they learn about the cultures, animals, plants, foods, et cetera which come from each place.
Example: A three year old child chooses a country from map puzzle and finds it on the globe. Then they find the flag of that country, the corresponding animal replica, name card, landmark replica, and photo of a view of that country. Although they might not have been there, they build a knowledge of that place and a respect for its culture, widening their world view with every minute spend working in this area of their classroom.
We currently have the first globes, maps, and early puzzles in rotation on our shelf, but this is an area I plan to expand on significantly in our classroom and include a geometry cabinet of all kinds of objects and photo cards to be sorted and grouped with the continents, countries, and ocean puzzles.
Practical Life Skills
Practical life is the link to the classroom for toddlers entering the preschool environment. At three years old the children are already familiar with cleaning, cooking, and self care, and this area includes all their favorite materials with an elevated level of challenge. New materials include ironing, polishing silver, sewing, woodworking, tending the garden, grinding spices and making tea, and so many other beautiful activities which allow the child to learn lifelong skills.
For example: The child knows how to thread beads using a needle – now those skills are elevated to embroidery and perhaps the child will use them to sew a purse or pillow or weave a cloth on the loom.
The practical life area in our classroom extends throughout our entire school as the children have their own complete kitchen, washroom, woodworking bench, herb garden, cleaning area, self care area, various washing stations, and of course, this shelf of lovely materials. Children can use their materials to polish, sew, wash, grind, grate, braid, screw, spray, and explore their curiosity whenever they want. That’s why this shelf is found right in the middle of the room.
Art and Music
Our art shelf continues to offer interesting opportunities for children to develop their creativity. We also have a music shelf complete with various instruments. In the future we plan a large expansion of our music area to include materials for learning notation (how to read music) and discern the notes on the scale using their auditory sense.
Food Preparation
Every class children enjoy a meal which they help prepare together. Children can also prepare a snack for themselves or use materials to make clay or pasta. The table is beautifully set by the children with flowers they arrange themselves and the napkins they have ironed and folded. This is perhaps the greatest visual of their great capacity for independence and mutual consideration.
Our classes are fully equipped in this area already and in the future we plan to set up a full child-sized kitchen complete with countertops, a mini stove and refrigerator. 🙂
Grace and Courtesy
Grace and courtesy is a fundamental concept of Montessori, which is an education for world peace. The activities promote self awareness and social awareness through control of movements and exercises of sound and silence. The two most well known are the ceremony of passing the bell (without making it ring) and walking the line (without faltering).
Here is the line we’ve set up on our carpet which is home to all of our hellos, goodbyes, and exercises of grace and courtesy.
& more!
In addition to all the wonderful areas of our classroom above, we also plan to have the following in our new expanding Montessori environment:
outdoor garden to teach horticulture and give a farm-to-table experience
climbing wall for gross motor coordination and spacial awareness
water lab for fun and experimentation with volume, pumps, and gravity
The Montessori Movie
Would you like to see a Montessori Preschool in action? This documentary follows a Montessori 3-6 classroom in France for one year and it is truly moving to see what children achieve after just a short time in this beautiful school.
Our snack preparation area is one of the children’s favorites in our Montessori Toddler and Montessori Baby classes! These materials can be used as early as 14 months up to 3 years old! Find 12 Montessori snack materials for toddlers below, including their presentation descriptions and links where to find all the tools!
Montessori Kitchen Setup
To encourage independence and responsibility, set your little one up for success by preparing a couple of these snack materials every day so your little one can make themselves a snack whenever they feel hungry. Your child can also prepare extras to share with you or a sibling. We also always have our little water dispenser available so the little ones can take a cup of water whenever they feel thirsty. There is just a little bit of water inside. In case it spills everywhere,
only offer as much water as you are willing to clean up afterwards.
Toddler Snack Table
A little snack table is a wonderful addition to the eating area, as little ones can take their work to the table, sit down and prepare their snack, and enjoy it in peace. Of course, when having family meals the child still joins the family table, but this space is for all the times they eat snacks alone. We love our adjustable table and chair set, handmade from beechwood.
Washing Dishes
Of course after enjoying their snack, your little one can help to clean up by putting their trash in the bin and placing their dirty dishes in a box to be cleaned. If you have a learning tower up to your sink, or a little wash station like this one, they can wash up their dishes themselves!
In our classroom the toddlers get water using this pitcher from the sink, fill the basins, wash and dry their dishes, and empty the dirty water into this bucket. They can then carry the bucket to the sink and empty it out again. It seems like a lot of steps, but the toddlers LOVE all this purposeful water work and they also enjoy seeing the result of a dirty to clean dish. This activity builds so much self esteem and is about much more than just washing up their dishes. 🙂 This is a custom wash station built with love by my husband, Chad at Montessori Mother Materials. 🙂
Montessori Snack Materials 1-6
Find the corresponding material presentation descriptions and links below! I tried to find the exact links I used wherever possible, but some materials I purchased a long time ago so I have listed the closet alternative I could find.
Food
Description
Setup
Egg
Crack egg on both sides with pestle, peel, add the bits of shell to mortar, slice egg in egg slicer, spoon onto plate, crush eggshells with pestle, enjoy!
Cut mint and/or lavender from the gardenWash in the sinkPluck or cut leaves and place into flowered teapotAdd warm waterCount to 10 or 20 with the child to let the tea brewPour into glasses Invite friends to tea
Practical life work is the cornerstone of Montessori from 0 to 3. Caring for the environment and self-care is the greatest goal of the walking toddler. Now that they can carry themselves upright like adults, they want to achieve total functional independence. Their school can offer rich opportunities to reach functional independence because the entire classroom should be prepared to suit their needs. At school the teacher is observing them constantly and can change the environment for them. This means offering concrete practical experiences by which children can do purposeful work and have success in doing so. This is the work which will open the door to responsibility and self-awareness, and link the child to the world.
The activities are called ‘Exercises in Practical life’ because real everyday life is carried on in which all housework is entrusted to the little ones who execute, with devotion and accuracy, their domestic duties becoming singularly calm and dignified.”
— Dr. Maria Montessori. The Discovery of the Child. Ch. 3.
Das Kind Magazine
For the full version of this article (translated in German!) and other Montessori inspiration by the Deutsche Montessori Gesellschaft, you can sign up for biannual issues of “Das Kind” magazine for €20 a year.
In Montessori we refer to “normalisation” as the integration of intellect and movement. Especially for children who struggle to find peace and balance, through practical life they find opportunities to create order, repeat movements, explore the senses through manipulation, move freely, and imitate adults.
Movement is the secret for holding the attention of the child.”
— Dr. Maria Montessori, Creative Development in the Child I
Activities in practical life have a cycle of preparing the work, concentrating on the process, and satisfied rest once the work is complete.
GUIDELINES FOR PRACTICAL LIFE
Organise activities in the appropriate areas. Water materials should be near the water source; tooth brushing should be in the bathroom; and so on…
Each activity has its own place in the environment.
Everyactivity is complete. The presentation of the material should be logical so that the child can follow the use of the material easily. Have extra materials available in case something needs to be replaced.
The characteristics of the materials should be appropriate for the child. Weight, size, fragility, and other factors must be considered.
Make the materials beautiful.
Colour code the materials. Most of the materials should be matching. This is for the sake of beautiful presentation and to remind the child which materials go together. If an activity is not colour coded it does not need to be excluded from the environment.
Use points of interest.
Points of interest encourage the use and repetition of materials. This may include sensorial experiences such as making bubbles, fogging a mirror, or anything that is exciting and interesting for the child.
Only keep a limited number of materials. There are few materials of which we have many. For example, you may have several cutting knives so multiple children can cut together in the kitchen area. However, in principle there should be only one of each exercise. This teaches the child to wait for his turn and respect the work of others.
Check the activities often. Prepare the environment before the children arrive and constantly over the course of the day. Check every exercise to make sure that everything is clean and ready to use. If you find an abandoned mess, invite a child to help you. If no children clean up with you, clean it yourself with precision, in case a child might be observing you. If you don’t have time to clean at that moment, take the material out of the environment and finish cleaning it later.
Practice your presentation until it is done normally and beautifully before you present it to the children.
Observe the child and make changes you observe help them to have success.
HOW TO PRESENT PRACTICAL LIFE MATERIALS
Invite the child. Approach the child and model how to get someone’s attention respectfully. Give an enthusiastic invitation which is not a question, nor a command.
Go together with the child. Keep the child’s pace. You may offer your hand to the child and the child may accept it or not.
Involve the child. During the first presentation, do only the first half of the work and let the child finish it.
Analysis of movement Observe your own movements: how fast they are, how you stand, if you are blocking the child’s vision…
Language Give the child the names for things before presenting. This is done by isolating the noun or verb and avoiding moving while speaking. “sponge”
Be aware of your body posture. When you bend over, bend the knees and lean forward slightly. Remain standing. Don’t squat or kneel less the child could also squat or kneel.
Wear aprons The adult and the child both put on an apron when the activity calls for it.
Let the child take over the work. When the child shows they want to take over some work, let them take it over. As soon as a child loses their concentration on a new task, you should be nearby and ready to get involved. Sometimes letting child hold something or fetch something for you is enough to let them feel involved.
Clean up. As soon as you see a working child has lost concentration, you should get involved and give the clean-up presentation. Always encourage the child to clean up independently. If need be, you can go back over spills or fix small things in the material later. Children often forget or don’t clean up and need to be reminded to do it. This doesn’t mean that they don’t enjoy cleaning.
a photo tour of the practical life in our classroom
– WELCOME TO MONTESSORI CLASS! –
photo by Natalia Smirnova
Get ready! The first thing toddlers do when they come into class is sit down, take off their shoes, put them in a “special place on the shelf”, hang up their jackets, and put on their indoor slippers. They feel so proud as they put their things away and get to work.
Cleaning shoes If they are very interested in shoes, there are also two shoe brushes fastened to the side of the shoe shelf where they can clean all their friends’ shoes and even the parents’ if they like.
photo by Chad Chittenden
Washing hands
Having a low source of running water is by far the greatest resource I feel that the environment offers toddlers. As soon as they are standing, they can stand in fascination for minutes letting the tiny stream of water fall over their fingertips and turning the spout on and off. The sink satisfies the sensitive period for water and gives the child access to all the water-based practical life activities. It allows them to explore and “play” with water, while having the responsibility and focus of purposeful work.
Toilet Awareness
In the bathroom there is this beautifully and simply prepared area for potty learning where little ones can practically explore their interest in the potty and learn how to use it Montessori-style.
– WORKING IN THE KITCHEN –
photos by Kerly Ilves
Get a drink
When toddlers feel thirsty, they can go to the kitchen area and take a cup and pour themselves some water from a pitcher which comes out of a dispenser or prepare themselves fresh orange juice made from toddler-sized mandarins.
Prepare a snack
When the feel hungry they can go to the kitchen and prepare a snack for themselves. I always put out 2 food preparation activities at the child’s level, one group snack preparation activity (at my level to bring down and do with the children), orange juice squeezing work, and the water dispenser with just a minimal amount of water inside. As my trainer Patricia Wallner would say, “Never put out more water than you are willing to mop up.” 🙂 Food preparation activities include cutting bananas, cucumbers, or strawberries, peeling pears, peeling mandarins or hard-boiled eggs, plucking grapes, cracking peanuts, and spreading cream cheese on crackers.
Washing the dishes
Sometimes after eating or drinking a toddler may want to wash their dish or those of their classmates. I also put out 2 “dirty” metal plates each class with just a little bit of coffee grounds on top to give the opportunity to make a distinct dirty-then-clean connection.
photo by Karen Ong
PRESENTATION: The child fills the basins with water, squeezes/shakes in some liquid soap (90% water, 10% baby-safe dish soap). They carefully choose which single dish they would like to wash. Often, they enjoy using it to transfer water between basins – a beautiful discovery. After they have finished washing the dish, they set it to dry on the rack and pour out the basins into the bucket. They bring the bucket to their low sink and dump it out. After replacing the materials, they mop up any spills with a mop for the floor or a towel for anywhere else.
– CARE OF THE ENVIRONMENT –
Taking care of their environment is a toddler’s favourite activity because it is their way of connecting and having an impact on the world around them.
photo by Chad Chittenden
Washing the table
Presentation: When you or the child notice that a table is dirty, invite them to wash it. The child fills the pitcher of water and pours it into the basin. Replace the pitcher in the basket. Wheel the cart to the table which they would like to wash. Wet the brush and soap and rub the bar of soap into the brush. Show the child how to scrub the table and let them try. After the table is scrubbed replace the brush and take the sponge. Slowly wet the sponge and squeeze it out – invite the child to try. The child wipes the table. Show the child where to put the sponge. Use the mitt to dry the table. Invite the child to clean another table. When they are finished, dump the water from the basin to the bucket. Carry the bucket to dump it out. Replace the bucket. Push the cart back to its place.
Mopping The toddler’s fascination with mopping is truly beautiful. Once the floor was wet, and now it’s dry! One of the first signs I see when a baby is becoming a toddler, is that they start mopping! In the toddler class, the mop is almost constantly in use because toddlers often spill drops of water when they do practical life and are eager to mop up every drop.
Sweeping
It’s quite difficult for toddlers to sweep something up and dump it into the trash. They love concentrating on this work and doing their best. I also have a small vacuum they can use to clean up messes if they spill sand or soil.
Dusting
Recently I added the duster to our cleaning area for dusting the walls and picture frames. Because brooms and mops can only be used on the floors, I found that the toddlers also needed something to clean the walls with and this was important to many of them. As Montessori guides we must observe the child’s needs and adapt the environment to meet them where they are at.
photo by Kerly Ilves
Feeding the fish Feeding the fish teaches respect for other life. It is also so relaxing to watch the fish swim around and can help the toddlers find calm.
photo by Karen Ong
Washing cloths Cloth washing is one of the most advanced practical life activities for toddlers who really need to exercise their concentration and do work involving lots of movement and multiple steps of varying difficulty.
AGE: from 2 years PRESENTATION:
Invite the child to put on an apron with you. Ask them to choose which cloth from the bucket they would like to wash. Put the cloth in the left basin. Invite the child to fill the pitcher and carry it to the basin. Fill the first basin and go back for more water to fill the second. After soaking the cloth with water, demonstrate how to lather the cloth with the soap bar and scrub it. Wring out the cloth and hang it on the clothesline. Both of you take a clothespin and secure the cloth. Invite the child to wash another cloth by themselves. When they are finished washing or lose concentration, begin the cleanup process. Put the bucket on the floor. Each of you pour a basin of water into the bucket. Let the child carry the bucket of water to the sink and empty it. Replace the bucket and use the mitt to dry the basins and table. Mop up any spills. Hang up the apron.
photo by Natalia Smirnova
Washing windows This is material is a very popular material on the shelf. Toddlers love to go all around the school and spray the windows, glass doors, mirrors, and aquarium with this tiny spray bottle and watch the water slowly run down. They use a squeegee and a small towel mitt to wipe up the water. Older toddlers like to bring a step stool so they can clean even higher. It is one of the best materials for very active toddlers because it offers movement, water, and clear before + after results.
– SHARING CULTURE WITH TODDLERS –
The child has the potential to incarnate any human characteristic, language, religious/spiritual connection, and culture. Here are two practical life activities for sharing culture with toddlers.
photo by Natalia Smirnova
Hanging art
This material allows the child to choose which art they would like to hang on the wall. In the basket there are various famous paintings, photographs and drawings by famous artists like Van Gough and Renoir.
Decorating a holiday tree
Over the holidays the toddlers really enjoyed decorating this real tree with baby-safe ornaments and bead strings.
– CARING FOR PLANTS –
Working in the garden
In the garden the toddlers really enjoy watering the flowerbeds, planting seeds, sweeping the deck, blowing bubbles, jumping on the trampoline, exploring the sandbox, and collecting the herbs and strawberries they grew.
Flower arranging In this sunny corner toddlers can water their plants and arrange fresh flowers into tiny vases. These flower arrangements adorn our table during the group snack time. Usually one toddler arranges all three and carefully places them side by side on the table with lace doilies underneath.
Plant watering work for babies It’s such a special experience when children are discovering plants, how to care for them, and thus how to respect other living things.
AGE: standing/12 months PRESENTATION: The first time I present this to a child I fill the watering can myself and invite them to watch me water the plant. I slowly pour half the water into the soil, using two hands. Then I set it down and invite the child to try. They will water the plant or possibly spill on the floor or try to drink the water. This is okay because they are learning! Use the sponge or towel to wipe up the spill. Invite the child to re-fill the pitcher of water. If the child is still not walking confidently, I fill the pitcher again for them with a very small amount of water from another pitcher which I keep at my level.
– LIFE SKILLS –
Self-Care
Toddlers love themselves deeply. In their self-care area children have access to several activities such as brushing + combing hair, wiping their nose with a tissue and tossing it in the waste basket, applying face cream (baby lotion), and trying on hats and sunglasses.
photo by Natalia Smirnova
Sewing In our classroom an entire shelf is dedicated to threading and sewing activities arranged from the simplest to most challenging. Eventually the toddlers can embroider with a yarn needle – work which they tape off and get to take home with them.
Woodworking station Woodworking is a very special area of pride in our school. Humans have the natural tendency to use tools to do their work. Not surprisingly the presentations for these materials are very short, because toddlers as young as 12 months can use them intuitively.
IN PRACTICE: Each tool has its own pre-prepared block which fits into the table insert. This keeps the block stable, isolates the difficulty of the tool, and supports the sensitive period for order. Toddlers love to sit at this station and go through all the tools which are arranged from least to most difficult, bottom to top, right to left. The presentations are hammering nails, wearing goggles, unscrewing screws, cutting soft balsa wood strips with a saw, sanding, and drilling holes. There is a small broom and dustpan available for sweeping up sawdust.
– GROUP WORK –
Group snack After the toddler work cycle one or two toddlers volunteer to prepare the snack and dishes for everyone. They push the food and plates to in a cart over to the table and sit down together. I invite each child individually to join us at the table where they may serve themselves or each other food and water.
Wiping the table After snack the toddlers can help clean up by wiping the table with sponges and water, putting their dirty dishes back on the cart and bringing the cart to the kitchen. Usually the interested toddlers do this for the rest of the group.
Baking days In addition to preparing snack for each other, once per month we have a baking day when we make muffins or cookies and enjoy them together at the end of class.
Brewing tea AGE: from 2.5 years, or when the child uses scissors Brewing tea using the mint and lavender leaves from our garden is the closest experience available in my school to a farm-to-table experience. They carefully brew the tea for their friends and enjoy it together at the table.
– SAY “GOODBYE” –
After a long morning of hard work, we gather together and sing songs. Then we say ‘goodbye’ before toddlers and carers get ready to go home.
photo by Natalia Smirnova
Thank you for joining me on this practical life tour through the Montessori Toddler Class! I hope you found it useful and interesting.
For our baking days this month the toddlers will bake lemon thumbprint cookies in pairs. The cookies turned out deliciously – I even baked an extra batch for the parents to enjoy! 🙂 In this blogpost I will walk you through how I prepare this baking workshop and share with you the vegan, gluten-free recipe that I used with my students. Enjoy!
Step 1: Prepare the trays
I had to practice the workshop a few times to make sure that the trays were set up for the toddlers to have maximum success during the workshop! The proportions also had to be perfect. In the end I used the recipe below divided into 5 portions to be baked by 10 toddlers working in pairs. Here’s how >>>
download recipe card:
(for 15 thumbprint cookies)
Step 2: Set out the mixing bowls and first trays
Two toddlers are sharing one mixing bowl and one tray of work. On each tray there are at least two tasks to make sure that every child has something to do during the whole workshop.
The reason I don’t give each toddler their own bowl and tray is because a – I like for them to work together on group cooking projects like these b – If one child is not interested and leaves their work, the other can continue c – Children of different ages can work together on tasks of varying difficulty
THIS TRAY INCLUDES: (in baking order + left to right)
Transferring the dried flowers (rose petals and lavender) using the pincer grasp
Transferring the sugar using a spoon
Pouring the lemon juice
Zesting the lemon using a cheese grater (grater from Joie)
Mixing it all together (wooden spoon from Ikea set)
Smelling the sweet, citrusy scent*
Step 3: Set out second trays
As the pairs finish mixing – in their own time- you can remove everything except the mixing bowl and wooden spoon. I set them up and bring them the next tray.
THIS TRAY INCLUDES: (in baking order + left to right)
Chopping the margarine using a toddler knife (from Tescoma or Joie)
Transferring the flour mixture using a spoon
Mashing the margarine (masher from Ikea set)
Step 4: Form cookies and arrange on baking trays
I bought a mini baking tray for each toddler so they could make their own cookie forms. This is done by rolling the dough into a ball, placing it on the baking sheet, and pressing the thumb down. After each child finished arranging their cookies, They placed them on a large tray and started washing up.
TIPS:
I pre-cut parchment paper for the mini baking sheets to save myself time with cleaning
If the cookies are too large or too thin they won’t all bake properly, so I had to re-shape a few of them before putting them into the oven
You MUST pre-heat the oven before putting the cookies in or the will spread
The cookies are finished baking when the tops are dry. If they start to brown on the edges they are burned.
Step 5: Cleanup
I prepared 2 basins with a small amount of warm water, 6 half sponges, 4 dry rags, and 2 broom and dustpan sets. The toddlers had just as much fun cleaning up as they did baking, maybe more. 🙂
Step 6: Decorating the cookies (optional)
For the Open Day Baking Workshop we decorated our cookies by spreading lemon frosting and sprinkling dried coconut. This was such a cute touch and the toddlers loved it. However since frosting is so sugary, this step is, of course, optional. The cookies are also delicious without frosting. 🙂 I have included the fluffly lemon frosting recipe below.
FROSTING RECIPE:
To decorate 30 thumbprint cookies – whip together the ingredients below and cool frosting in the refridgerator while baking.
2 cups powdered sugar
2 tablespoons softened margarine
10 tsp fresh lemon juice
1 tsp applecider vinegar
Extra cookies were sent home in a paper cup and mini paper sack. 🙂
I baked with toddlers every day for a week and here is everything I learned!
How did you use Montessori to bake with a group of toddlers ?
colour matching
trays of activities/isolation of difficulty
the children could join in or leave at any point/allowed the children to follow their own interests
it was age inclusive, children from 15m to 4yrs participated together
we had a big cleanup session afterwards that was enjoyed by the children as much as the baking.
learning through observation
How keen were the toddlers on baking?
During the first hour of the class I invited the toddlers to cook with me at our group table and we started peeling pre-cut pieces of bananas. Some groups were more interested than others. Having a group activity was something we hadn’t done before and I many toddlers decided to continue with their normal class day, as if to say, “No thanks. I have work to do. See you at snack time!” The children who attended multiple baking days were generally more interested and aware of what we were doing, of course.
It was fun to make sure that each child involved in the process had a task to do that they were interested in. Some preferred wiping up the table and floor, some were very involved in the cooking process, while others preferred to observe or eat batter with a spoon. Some loved pouring in ingredients, but didn’t want to smash the bananas. All the toddlers got to eat their muffins together before the end of class, even if they didn’t help make them. This way every child got to be part of the group. The children were very generous and sweet sharing with each other.
What do you want to do differently next time?
I wish I would have included more language and vocabulary. On the last day a parent was going over the ingredients with two toddlers as they ate their muffins and I realised I could have done the whole workshop as a 3 period lesson: giving vocabulary, letting them explore each texture, taste, and smell, and then give demonstrative instructions of what we do with each ingredient.
What is the BEST thing about baking with toddlers?
Giving the children the opportunity to see the whole process of where their food comes from— from bananas and flour into a muffin. To go even a step deeper, with 3-6 year olds, you could ground dried oats to make your own oat flour. It’s really easy.
Working together on a group project was also interesting. It’s not something that happens very often with more than two or three students at a time.
Step-by-Step:
Step 1: peeling, chopping, mashing
Step 2: pouring, transferring, mixing
Step 3: sorting, scooping
Step 4: sponging, sweeping, drying
Vegan mini-Banana Muffin Recipe
Ingredients (makes 3 dozen mini muffins)
2 cups gluten-free oat flour
2 teaspoons baking powder
1 tablespoon cinnamon
1/2 teaspoon baking soda
1.5 bananas
1 cup soy milk
1/2 cup organic maple syrup
2 mini muffin trays
mini paper muffin forms
Mix dry ingredients in a bowl
Mash or puree banana in a separate bowl with milk and maple syrup.
Stir in dry ingredients
Spoon batter into paper muffin forms in the baking sheet
Heat oven to 200℃
Bake muffins for 10-15 minutes
Ready when the sides are golden brown. Remove from baking tray and let cool in a separate basket.
Let the toddlers enjoy and offer each other muffins!
>> recipe tips when baking with toddlers <<<
Start off with twice as many bananas as you need to make it into the batter. The toddlers will probably first like to sample them and make sure they are tasty enough.
Mix all the dry ingredients together yourself and then give them the mixture. They can use a spoon to transfer it into the bowl of liquid ingredients.
Measure out the milk and syrup in advance and pour into 2 separate pitchers
The muffins will turn out fine even if the ingredients don’t all make it into the bowl, and even if the batter isn’t evenly spooned into the forms. I promise. 🙂
Flour on a hard-wood floor is a great sweeping opportunity for toddlers. They LOVE it!
Thank you for reading! I hope this was helpful. Comment if you have any recipe ideas for Baking with Toddlers Pt. 2!
Preparing a Montessori space for toddlers may take some extra time and planning, but it doesn’t have to be complex or expensive! In this blogpost I have explained the Ikea hacks I used when preparing 5 different areas of my classroom, along with links and lots of photos.
1.Easel
This easel allows the toddler to explore their own artistic creativity. I find that toddlers are interested in painting almost as soon as they can walk from around 14/16 months old! Of course it’s important to use washable paint (like the ones sold by Ikea) and have a washrag or little mop nearby to clean up any messes. 🙂
Instructions |I used a hacksaw to cut the legs by 17cm and sanded the edges. I also dded a plastic hook to the side from which to hang the child’s apron. Clips hold pre-cut pieces of paper from the top of the easel. A bucket to the side holds extra pieces of paper. I have also added some art to the wall at the child’s level to beautify the space.
These tables can be used in the play area for concentrating on activity or in the kitchen as a snack table. I have also seen them used as sensory tables and dollhouse tables. Toddlers LOVE having their own place to sit and work or eat. It’s something so simple, yet so important for them.
Instructions |Shorten the table so that it stands at a comfortable height for toddlers (38cm). Also shorten the chairs by 7cm. It’s slightly time-consuming, but very doable to make these with a simple hand saw and some sand paper-and it’s very worth it!
The self care area is a place where toddlers can go to brush their teeth, comb their hair, wipe their nose, put on sunscreen, etc..
Instructions | At home you might add a self care area to the bathroom or changing area to support independence and collaboration. I also added some hats and a basket of sunglasses for the children to try on. Notice that the chair is the same as the one from the toddler table in IKEA hack #2.
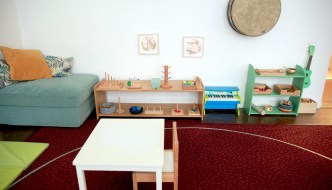
This is a quiet area in my classroom where toddlers and babies can go to read, watch the aquarium, play music, and relax.
Instructions |I made this new cover and pillow to make the chair more inviting and beautiful. Also the Ikea chair cover is not washable (be careful!). While assembling the bead tracker, I added only one bead to each track in order to give the activity a clearer purpose: transferring beads from one side to the other.The extra beads are perfect for a threading material.
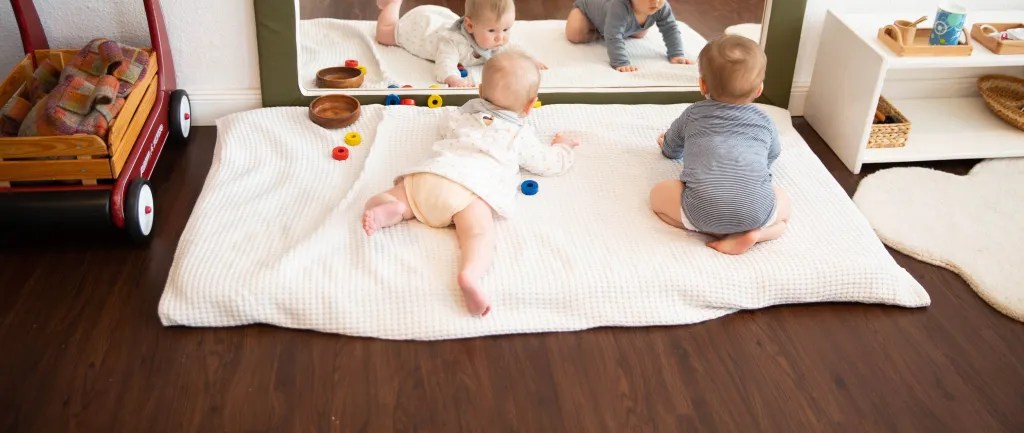
From DAY 1 we can start to offer freedom of movement. This movement area is a place where non-walking babies from 0-6 months can observe their movements and the world around them through the mirror. Visual mobiles hang within Baby’s range of sight and move naturally with the air in the room.
Instructions |Mount the mirror to the wall for safety. You can also secure the back with duct tape if the mirror is made from glass rather than acrylic glass. Attach the hanger to the wall and use a string to tie the mobile and adjust its height. On the mattress you can also put a fitted sheet for easy cleaning.
Thank you for reading! I hope you found this post interesting and helpful! I plan to make 2 more of these posts soon. Feel free to leave a comment or suggestion below if there is something more you would like me to include next time!