
Montessori Ikea Hacks – part 1 is by far the most popular post on this blog. Since 2019 both our Montessori classroom and my IKEA hacking skills have come a long way, so I am sharing some before and after photos from those original areas posted AND 4 more corners of our school which were made from IKEA furniture. I really love IKEA, can you tell? 🙂
Toddler Woodworking Station


The woodworking station is a special place of pride for our students. Humans have the natural tendency to use tools to do their work. Because of this, the presentations for these materials are very short because children as young as 12 months can use them intuitively. Older children use this area to make their own, small constructions. 🙂
HOW TO USE:
- Each tool has its own pre-prepared block which fits into the table insert. This keeps the block stable, isolates the difficulty of the tool, and supports the sensitive period for order.
- The tools are arranged from least to most difficult, bottom to top, right to left. This is useful for a mixed age classroom, or for different-aged siblings using the work station at home.
- The presentations are hammering nails, wearing goggles, unscrewing screws, cutting soft balsa wood strips with a saw, sanding, and drilling holes. There is a small broom and dustpan available for sweeping up sawdust.
- Older students usually prefer to work here while sitting in the chair, while babies prefer to sit on the floor or work while standing.
- We teach safety and respect for the tools by setting limits on how and where they may be used. Safety goggles are available and the tools may be used with or without them. We don’t use gloves in this area because they get in the way of the child’s precision.
HOW TO MAKE (photos linked)


Work blocks, table insert, and balsa-wood sawing dowels are homemade by Chad, woodworker. and Montessori guide. Custom orders can be made to montessorimothermatierlas@gmail.com


Toddler Library

This library is a simple, cozy place, bright with natural light, where children can easily choose their books and read them. They love to sit on the reading bench. The little table and chair is also available because it’s more comfortable to read large books there.
TIPS:
- Avoid layering the books so they don’t fall down when the child chooses them.
- Limit the number of books on the shelves, keeping the rest on your adult bookshelf or put away.
- Rotation: keep the child’s favourite books on the shelf. Switch out books which are not often read or damaged books.
- Hang the shelves at the child’s level, very low to the ground, so that they can reach even the top shelf.
- If you have vintage books or treasured books that the child can only read together with you, keep these on a higher shelf within the child’s view so they can let you know whenever they want to read it.
- Model respect for books by handling them very carefully and not setting them on the floor.
- Try to read only one book at a time, putting them back on the shelf after looking at them. This helps to support concentration.
HOW TO MAKE (photos linked)


Plant Care Areas


Having living plants at home teaches children how to care for living things which are smaller than them. They learn about the different needs of plants and the benefits and consequences of how their needs are met. If the plant is watered well and kept in the light, it will flourish. If it is watered too much or too little, it will die.
A plant and watering can is a great gift for a child. They can even pick out their own special plant at the store or grow it up themselves from a seed. The plant table is a special place where the plant lives and where you keep the watering can and towel.
HOW TO USE:
- Fill the watering can yourself and invite the child to watch you water the plant.
- Slowly pour half the water into the soil, using two hands.
- Set the watering can down on the table and invite the child to try. The child will then water the plant or possibly spill on the floor or try to drink the water. This is okay because they are learning!
- Use the sponge or towel to wipe up the spill.
- Invite the child to re-fill the pitcher of water by themselves. If the child is still not walking yet, fill the pitcher again for them with a very small amount of water from another pitcher which is kept at your height.
HOW TO MAKE (photos linked)


Parent & Child Dressing Area


A child-sized dressing area helps children to be responsible for their personal items and practice self-dressing. This area includes a child shelf, an adult shelf, adult changing chairs, a child changing bench, and both low and high coat hooks.
HOW TO MAKE (photos linked)


UPGRADES IN OUR CLASSROOM
1. Art Area
BEFORE

AFTER

changes:
- This easel and clip set up is still the one we use today! The new easel model from IKEA is great in that the height does not need to be modified and the paper roll is easier to use (we have this model at home for our toddler). However, it does not have a tray to hold paint cups. For this reason our trusty IKEA hacked easel is still going strong in our environment and is nearly constantly in use.
- We have added another chair and table set to this area.
- The chest of drawers is near the shelf and in its place is a Montessori hand washing station, strategically placed for washing painty hands. 🙂
- This lamp was replaced for the lovely IKEA FUBBLA lamp. The only drawback with this one is that the button for turning it on and off is very tough and only our 2+ year olds can manage to push it completely.
- We added a hook to the wall for the apron, so it would not be in the way if a child chooses not to use it.
- Hidden behind the easel we have a small Tesla tape dispenser to easily hang up wet paintings and tape paper sheets to the easel at the bottom.
- We have 3 washable Stabilo crayons in a grooved base available now on the tray.
- In Montessori also offer 3 colours of paint at a time now, rather than just two. In Montessori Baby Classes we either offer 1 cup of paint or only the crayons.
- We now use a paper roll which is 60cm wide which covers the entire easel surface, giving the children a larger and more obvious surface to paint on.
- We changed the old unfinished wooden frames for the plastic FiSKBO frames which are easier to keep clean.
2. Toddler Work Area
BEFORE

AFTER
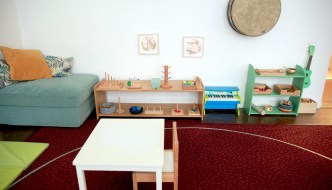
changes:
- These tables had to be replaced after much use and love. We now use the KRITTER tables from IKEA, which have also been shortened to stand at 38cm tall.
- The chairs are still the same as we have had since 2018! We have only broken 1 chair out of 15 in all this time!
- Our wall art is now displayed in the plastic HOSTVA IKEA window frames. They are a little crooked, because we have to drill new holes after them being pulled down so many times. 🙂
- We have a new music shelf, custom built and painted by Chad (montessorimothermaterials@gmail.com)
- The table and chair set in this area now lives in the middle of the space, with the shelves against the wall. I find this to be more inviting for the children to sit down and work.
3. Self Care Area
BEFORE

AFTER

changes:
- We have a different tray which allows me to separate the different materials: trying on sunglasses, wiping nose, and brushing hair.
- I have added a sign to the waste basket that reads “dirty tissues”
- I have added a backpack, a straw hat, and a helmet to the wall hooks to offer more try-on possibilities.
- I have a larger lotion jar now and a this little round tray to hold its place.
4. Quiet Corner
BEFORE

AFTER

changes:
- In front of the shelf I have added a faux wool carpet, TOFTLUND from IKEA, to make the area cosier.
- The bead tracker is in a different part of the Montessori Baby Class environment. Now we have here a large ficus plant for the students to water.
- We have a different armchair from Verbaudet. I sewed the cushion cover from the same animal print textile because I loved it so much.
- We have a different ball tracker from Nienhuis now in a different place in the classroom. It its place is the scale and weights from Educo with a mystery box base, custom-made for it by Chad.
- The books are rotated every term. Now we keep 6 small books in this area, instead of 4. We didn’t have as many books back then. 🙂
- Under the aquarium we rotate the materials in each class depending on the age group. During Montessori Toddler Classes we keep two 3D puzzles.
- The art is a print by Monet, available on Wikipedia Commons for free. It is hung in a plastic frame, the RIBBA from IKEA.
5. Newborn Movement Area
BEFORE

AFTER

changes:
- The walker wagon has 4 rice bags which are used to weigh it down so it rolls more slowly. I sewed handles on the bags so that toddlers can practice loading and unloading the wagon when they are in the Maximum Effort stage of development.
- We have a new pillow in this area, LEN from IKEA. And I sewed a fuzzy pillowcase for it. This is used in Montessori Toddler Class when children pretend that they are sleeping or decide to lay down for a rest. In the Montessori Newborn Class I remove this pillow for freedom of movement.
- The visual mobile and materials on the newborn shelf are rotated every term. Currently on the shelf we have basket of balls, basket of brushes, sensory wheel, simple threading work – (bottom), posting sticks, outlet puzzle, transparent lock and key, and wooden blocks – (top).
- I have added a cloud carpet to the other side of the shelf for babies to work on.
- A small, plastic FiSKBO frame is hung on the wall with Tesa tape. The art is “Girl with a Watering Can” by Pierre-Auguste Renoir, available for free on Wikipedia Commons.
In my blogpost Changes at Home When Your Baby Becomes a Toddler I have shared 3 areas of my daughter’s Montessori home environment, which features the classic functional toddler kitchen IKEA hack.

Thank you for reading!
– Katelynn
This is all brilliant